Two apps I’ve been working on for the last 4 months have been released today in the app store: Passie voor Horeca and Passie voor Horeca LITE. I submitted them last monday so that’s 5 days until Apple approved it, that’s pretty fast if you ask me
This app features the custom swipe on a UITableViewCell so you can get a feeling on how it works live.
Specifically one that can handle more then 4GB of RAM..
Don’t get me wrong, I have a nice setup here, with a 24″ iMac, a 2nd 24″ screen, and a Tritton See2 xtreme USB video adapter for a 3rd 21″ screen.. (to the devs of this device: Update your damn drivers to be Snow leopard 10.6.3 compatible and support 1920×1200 resolution for gods sake, I bought this thing because it had OSX support)
But with 2 Firefox windows open (each having about 12 tabs open), Xcode, the iPhone simulator, Mozilla thunderbird, sometimes Photoshop to review the work my designer’s cooked up for my apps AND Parallels for Paint Shop Pro 6 (hey I’m a programmer, not a designer.., it’s what I learned to work with back in my Windows years ), 4GB seriously isn’t enough!
If I leave my iMac running for a few days, I put it in sleep mode inbetween, the memory usage becomes quite high. After a week or so it starts some serious swapping. I just had to reboot because I was swapping 1.8GB to disk, you have any idea how slow your Mac becomes when it does that ? When you look at funny YouTube video’s of cats jumping in boxes, it stutters and hiccups madly. If my poor iMac could moan under the stress, it most certainly would!
So either I need one of these semi-new 27″ widescreen iMacs that support up to 8GB of RAM, or I need (want?) a spiffy Mac Pro that also handles more then 2 screens properly..
For a project I’m currently working on, I needed to show a ‘Load more’ cell when there were >25 results, this is not a basic 1-2-3 on how to fill tablecells with data, so below code is assuming you already have that and it’s left out
In my code I will fetch a maximum of 25 results (which can be less) and stick this into an array. If the array count is 25, we have to add an extra cell, to do this we increase the count by one:
NSLog(@"Setting numberOfRowsInSection to %i",[self.localJsonArray count]);
if ( [jsonArray count] < 25 ) {
return [self.localJsonArray count];
} else {
return [self.localJsonArray count] + 1;
}
}
Next we populate the tablecells, we fill it with data from the index, and we look if we’re still working with data or are at the +1 we defined above:
static NSString *CellIdentifier = @"Cell";
ImageCell *cell = (ImageCell *)[tableView dequeueReusableCellWithIdentifier:CellIdentifier];
if (indexPath.row != [localJsonArray count] ) { // As long as we haven’t reached the +1 yet in the count, we populate the cell like normal
if (cell == nil) {
cell = [[[ImageCell alloc] initWithFrame:CGRectZero reuseIdentifier:CellIdentifier] autorelease];
}
NSDictionary *itemAtIndex = (NSDictionary *)[self.localJsonArray objectAtIndex:indexPath.row];
[cell setData:itemAtIndex];
} // Ok, all done for filling the normal cells, next we probaply reach the +1 index, which doesn’t contain anything yet
if ( [jsonArray count] == 25 ) { // Only call this if the array count is 25
if(indexPath.row == [localJsonArray count] ) { // Here we check if we reached the end of the index, so the +1 row
if (cell == nil) {
cell = [[[ImageCell alloc] initWithFrame:CGRectZero reuseIdentifier:CellIdentifier] autorelease];
}
// Reset previous content of the cell, I have these defined in a UITableCell subclass, change them where needed
cell.cellBackground.image = nil;
cell.titleLabel.text = nil;
// Here we create the ‘Load more’ cell
loadMore =[[UILabel alloc]initWithFrame: CGRectMake(0,0,362,73)];
loadMore.textColor = [UIColor blackColor];
loadMore.highlightedTextColor = [UIColor darkGrayColor];
loadMore.backgroundColor = [UIColor clearColor];
loadMore.font=[UIFont fontWithName:@"Verdana" size:20];
loadMore.textAlignment=UITextAlignmentCenter;
loadMore.font=[UIFont boldSystemFontOfSize:20];
loadMore.text=@"Load More..";
[cell addSubview:loadMore];
}
}
return cell;
}
And voila, cell #26 is the ‘Load more’ cell, next we start detecting if it’s that cell that’s being selected:
if ( [jsonArray count] == 25 ) { // Only call the function if we have 25 results in the array
if (indexPath.row == [localJsonArray count] ) {
NSLog(@"Load More requested"); // Add a function here to add more data to your array and reload the content
} else {
NSLog(@"Normal cell selected"); // Add here your normal didSelectRowAtIndexPath code
}
} else {
NSLog(@"Normal cell selected with < 25 results"); // Add here your normal didSelectRowAtIndexPath code
}
}
Note that I’m working with 2 arrays here, jsonArray and localJsonArray, the jsonArray is what I fill with new results, i.e. 1-25 26-50, the localJsonArray is what’s being filled more and more, so on every ‘Load More’ selection, the localJsonArray will grow with +25 if there’s >= 25 items to load.
In general try to avoid to set too many global variables, instead use local class variables instead to keep things as less complicated as possible.
But sometimes it can come in handy to set variables in your app that you can address from all your classes.
The easiest way to do this, is to use your AppDelegate class for this. You can just include your AppDelegate where needed and address the functions and variables that are in there.
First, define the variables in the AppDelegate’s .h and .m files:
@interface My_ApplicationAppDelegate : NSObject <UIApplicationDelegate, UITabBarControllerDelegate> {
UIWindow *window;
NSInteger *myGlobalInteger;
}
@property (nonatomic, assign) NSInteger *myGlobalInteger;
@implementation My_ApplicationAppDelegate
@synthesize window,myGlobalInteger;
To access these global variables from and to your AppDelegate class, first include your AppDelegate in the .m file of the class where you need it.
And then define the following in the function where you need to access the variable:
My_ApplicationAppDelegate *appDelegate = (My_ApplicationAppDelegate *)[[UIApplication sharedApplication] delegate];
appDelegate.myGlobalInteger = 1;
NSLog(@"The integer value is %i",myGlobalInteger);
}
And voila, you can access the myGlobalInteger value from everywhere where you allocate the My_ApplicationAppDelegate like shown above.
Formatting a proper date string can be a bit tedious, I’ve tried to work with the time function available in C, but that didn’t work out very well due dates not getting converted properly to my locale (Dutch in my case).
After fiddeling quite a bit, it turned out that combining NSDateFormatter with NSLocale and NSDate would work the magic I needed for displaying a proper date in a UITableView.
NSLocale *nl_NL = [[NSLocale alloc] initWithLocaleIdentifier:@"nl_NL"];
[setDateLocale setDateFormat:@"EEE, d MMM yyy"];
[setDateLocale setLocale:nl_NL];
NSDate *now = [[NSDate alloc] init];
NSString *FormattedYMD = [setDateLocale stringFromDate:now];
[nl_NL release];
[setDateLocale release];
[now release];
And voila, FormattedYMD now holds the current datestamp formatted as: ma, 6 apr 2010
Now as it happens to be, I’m from The Netherlands and somehow Steve Jobs (or rather his marketing department) forgot to add our country to the known release dates (gives a certain feeling of Deja-Vu since the same happened with the iPhone).
While setting up a twitter account yesterday to post blog updates, I stumbled on two companies giving away free iPads. Basically if you tweet a post about it you enter the draw to win one.
In the left corner we have Webs.com, who are about to give away their 5th iPad today.
And in the right corner I just stumbled upon Ambrosia Software giving away 4 free iPads and a software pack on it.
Fine, now let’s win that iPad so I can start porting my already released KookJij app on it while the rest of the country awaits the official release
For one of my projects, I needed the makeiPhoneRefMovie executable which is normally only available on OSX. This program will make a .mov index file referencing various movies (.3gp, .m4v) for various available bandwidths and will compile under Linux (Tested on Debian and CentOS 5 64-bit), it’s based on the original source by Apple and some functions (mostly the OSSwapHostToBigInt32 unctions that aren’t known on Linux) merged together.
Extract and compile with cc -o makeiPhoneRefMovie -g makeiPhoneRefMovie.c
Usage:
# ../makeiPhoneRefMovie usage: ../makeiPhoneRefMovie foo-low.3gp foo-high.m4v foo-desktop.mov foo-ref.mov creates foo-ref.mov with a special-purpose iPhone ref movie the other files need not exist; they're just embedded as URLs
Somehow, I was always struggling with the proper certificates, permissions, names, icons, etc. when building an app for either my testers or the app store.
iPhonedevelopertips.com has a very nice distribution build cheat sheet online.
Whenever I setup a new project for Ah-Hoc distribution or for Appstore distribution, I go over several steps in this document, it saves a lot of headaches on why XCode is complaining on missing certificates, provisioning profiles or why your just built app just won’t install on that tester’s iPhone.
There’s a few methods to change your company name that shows up in new source files you add to your project.
To do it on a system-wide basis so it applies to all projects, open a terminal window, and type the following line (one line, no enters):
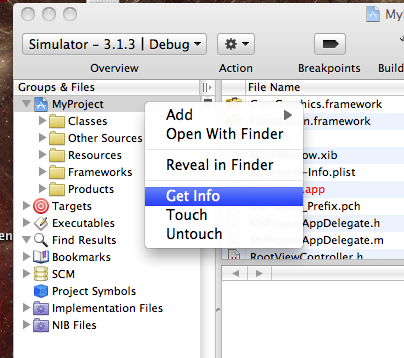
To do it on a per project basis so it applies only to files in your current project, right-click your project and select ‘Get info’
Now select the ‘general’ tab and change the company name to what you’d like in the project files to show up.
A nice feature of UIWebView is that you can make it transparent. This way you can set a nice static background in interface builder which blends with your app and doesn’t give the user a feeling they’re looking at a website. It’s the same technique I use in my KookJij app when watching recipes:
Everything under the blocked logo is web content in a UIWebView, behind that is a static background with watermark directly loaded from the app itself:
To get this effect, first define the UIWebView in the .h file
Next set the color of the UIWebView to a clearColor status in the viewDidLoad and load the content:
[myWebView setBackgroundColor:[UIColor clearColor]];
NSURL *url = [NSURL URLWithString:@"http://url.to/your/content.htm"];
NSURLRequest *request = [NSURLRequest requestWithURL:url];
[myWebView loadRequest:request];
}
And the final trick, is to set the background of the actual web content you’re loading in the UIWebView to be transparent too. So make sure the HTML page you’re loading in the webview has the transparent tag set for the body:
And there you have it, a transparent UIWebView with HTML content blending in perfectly with your app.
Recent Comments